Marine Surveyor – Welcome to Will KirbyFebruary 20, 2016
 EUROPEAN MARINE SERVICES Ltd Big Welcome to William Kirby
European Marine Services Ltd / European Marine Surveys – Are delighted to welcome William Kirby as a new Marine Surveying Associate.
William will be undertaking Pre Purchase Surveys on vessels of less than 50’ and focusing principally on GRP.
Moving from Bedfordshire at the age of 16, William followed his passion for boats & joined his parents in their new family venture of Freshwater Cruisers based in Brundall. Norfolk
Broadening his horizons, in 1999, William trained at Berkshire College to become a Boat Safety Scheme Examiner. He is also qualified as a Gas Safe Engineer carrying out LPG soundness testing, servicing & installations.
The small hire fleet soon developed into a larger scale business incorporating Marine Engineering, Boat Maintenance & General Repairs. This built up a good customer base & reputation for quality workmanship across the Norfolk Broads.
In 2014, some 21 years later it was time for his parents to retire, thus launching the beginning of William setting up on his own as Freshwater Marine focusing on Boat Safety Scheme Inspections & utilising his long established name within the Marine Industry to go forward.
In his spare time he volunteers with The Raptor Trust, rescuing & rehabilitating wild injured birds of prey as well as having his own Hawks which he flies during the winter months. He also enjoys attending motorsport events throughout the summer.
Qualifications:
- IIMS Diploma in Yacht & Small Craft Surveying. Qualified in 2004/05.
- Gas Safe Registered. Previously CORGI Registered.
- Boat Safety Scheme Examiner since 1999.
- Member of the Association of Boat Safety Examiners (ABSE)
- Full PI Insurance Cover with EMS Ltd
For more information contact European Marine Services Ltd. Marine Surveyors & Consultants
Tel : 01603 327 123 www.europeanmarinesurveys.com
Delta RIB 5.5m – High Speed Accident Damage at Sea (#00950)October 8, 2015
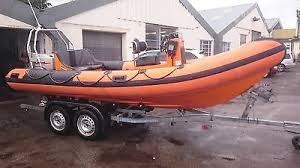
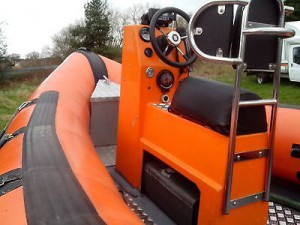
Delta RIB 5.5m
Acting as Marine Insurance Loss Adjusters, European Marine Services was recently instructed to inspect and report as follows:
- Casualty details including views on what caused the damage.
- Review the estimates for repairs to the third party vessel and advise whether you consider the work fair, reasonable and casualty related.
- Provide us with your reserve estimate.
- Witness details, where applicable.
- Subrogation* details, where applicable ( * Insurer’s right to pursue a third party)
- Photographs of the damage.
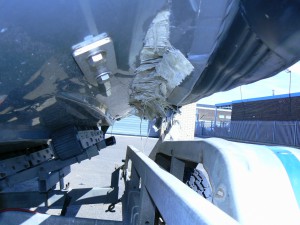
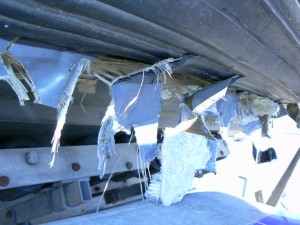
The accident happened at speed and resulted in extensive damage to the GRP hull plus rupturing the inflatable tube (sponson) with the RIB being close to sinking. Fortunately no one was hurt
View of extensive damage to GRP hull
What is important is not the results of our investigation / inspection or how the accident happened which remains confidential, but that the insurance company required the following documentation as part of its claim consideration from the insured parties
- Warranted all vessels classed and certified
- Warranted all vessels are fit to encounter the ordinary peril of seas, rivers, lakes or navigable waters, properly crewed, equipped, fuelled, provisioned and with all equipment in proper working order. Seaworthiness applies not only to the physical conditions of the hull but to all its parts, equipment and gear.
- Were the crew fully qualified up to RYA Level 2 power boating, VHF AND Sea Survival courses.
The above clauses (extracts) being part of the Insured Marine Policy Terms & Conditions ie. the small print
This being important to boat owners whom have the misfortunate to make a claim in the event of an accident
Therefore make sure that as an owner / operator / user of small high speed craft that you are fully aware of the Insurance T&Cs,
If not you may possibly find that you have no cover
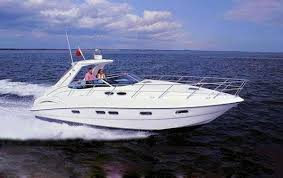
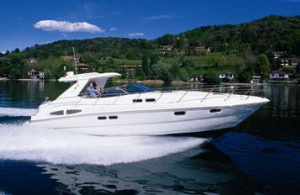
Sealine S38 – Structural Hull Defects (# 920)September 27, 2015
Acting in the capacity of an Expert Witness (CPR 35 compliant) we recently inspected a Sealine S38 for inherent structural hull defects
The background to this being as follows:
Sealine’s are generally considered to be lightly built and several models suffer from stress cracking / flexing of the hull.
The Sealine S38 suffered from an exceptionally weak hull GRP layup making it prone to vertical and longitudinal stress cracking – this being due to a miscalculation of the original layup specification by their design department *
The principal area of fault lying between the bow thruster tube and the forward engine bulkhead
Back in 2005 / 2006 Sealine agreed that additional strengthening work was required on the hull of the Sealine S38. This however was carried out on a boat-by-boat basis, and as we understand it no general recall notice was issued and Sealine only took action when customers complained.
Consequently there are many Sealine S38’s still in the market place which have not been strengthened
As Sealine are no longer in business in their original form – warranty / claims are no longer valid.
An estimate as to the cost of rectification can be anything between £15,000 – £25,000 depending upon who carries out the work
* Acknowledgement: Paul Homer, Homer Marine Ltd
For more information contact European Marine Services Ltd – Marine Surveyors & Consultants Tel : 01603 327 123 www.europeanmarinesurveys.com
Aquafibre 28 – The benefits of copper coating (#937)August 30, 2015
European Marine Services recently carried out a pre purchase survey of a very nice and well maintained Aquafibre 28
The significant difference about this boat is that despite being some 25+ years old and permanently moored on inland waterways there was no evidence of any hull deterioration or osmosis.
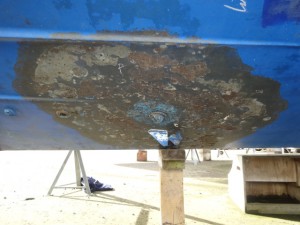
The lack of osmosis being primarily due to the early application of a professionally applied copper coating – no antifouling applied over.
View of Aquafibre 28 Copper coating
Most of the well known range of Aquafibre GRP hull & superstructure mouldings (25′ – 55′) were built / fitted out by other boatyards around the UK, as Aquafibre were primarily a GRP boat moulding company based at Rackheath nr Norwich Norfolk and not boatbuilders. Broom Boats being a major builder of boats moulded by Aquafibre. Aquafibre ceased manufacturing in 2009
Back to this Aquafibre 28 …..
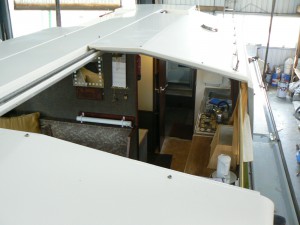
This design has the individual twin sliding large sunroofs over the forward driving position and saloon, making for a very nice relaxation area for socialising and watching the world pass by.
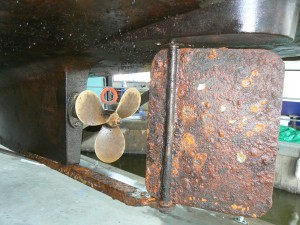
Decent sliding sunroof Corroded extended skeg assembly / rudder
The significant problem was that there was no access in this particular boat to the bilge spaces and hull sides for internal examination, being due to screwed floors, furniture / panelling / soft side linings etc and the distinct absence (again) of access hatches and removable panels.
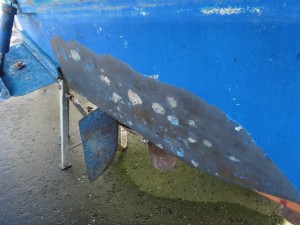
Relatively minor problems included the non operation of the auto bilge pump float switch and a corroded mild steel extended skeg assembly and rudder blade – no zinc anodes being fitted
For more information contact European Marine Services Ltd – Marine Surveyors & Consultants Tel : 01603 327 123 www.europeanmarinesurveys.com
Bounty 27 – Osmosis & Significant Gel Coat Delamination (#903)July 12, 2015
Bounty 27 – Osmosis & Gel Coat Delamination
The Bounty 27 c1970 was lifted ashore for the purpose of a pre purchase survey. As with most GRP vessels of this vintage the hull and superstructure had been painted white while the bottom was badly fouled with organic growth (having not been pressure washed). In other words nothing out of the ‘ordinary’ for a surveyor to inspect.
Similar Bounty 27 boats………….
However, serious GRP hull ‘problem’ areas started to become apparent
When inspecting the bottom, some osmotic blisters were visible intermittently on port side but the interesting bit was found on the starboard bow. Where the osmotic blisters were much more concentrated and over time have merged to form a much larger blister.
Gel coat delaminating Gel coat removed from sample area
This resulted in lifting and detaching the gel-coat from the substrate.
The gel-coat being under pressure has cracked, allowing water to get into the substrate. This process is known as wicking.
Wicking happens when the substrate is unprotected either by gel-coat or adequate paint. The strands in the fiberglass mat act as a straw and suck moisture into the substrate and consequently weaken the structure. Those single strand becoming saturated with water will turn white and be visible and easy to spot in the substrate.
Moisture (whicking) taken up in substrate Blister burst by applied thump pressure only
In the above left hand photo we see the white strand of the mat indicating wicking is taking place as well as gel-coat crack and delamination.
In the above right hand photo the area of visible gel-coat delamination equals to approximately 1 square foot. However when carrying out a ‘tap test’, the area of trouble was much greater and extensive. Note the wet patch which is a burst osmotic blister with ‘blister juice’ – this was burst using thumb only
Above left hand photo shows numerous osmotic blisters which will most probably merge in the future into a single large blister with probable delamination. The right hand photo shows ‘other’ damaged areas.
The gel coat delamination is from a buyer’s point of view a major concern as it can be expensive to put right and has to be addressed. However the boat can be repaired and probably will be structurally stronger following the repairs.
But the question is always the same, at what financial cost ? In my opinion this should be repaired since the rest of the boat is in much better structural condition, and there is still a lot of life and future enjoyment left in this boat
For more information contact European Marine Services Ltd – Marine Surveyors & Consultants Tel : 01603 327 123 www.europeanmarinesurveys.com
Princess 30DS | Electrolysis & Galvanic Action | #00854March 22, 2015
Princess 30DS – Electrolysis / Galvanic Action
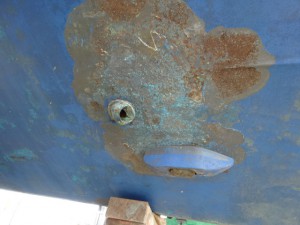
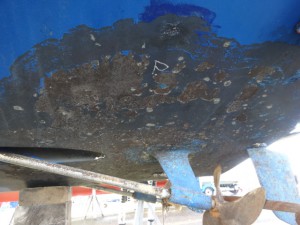
We undertook a Pre Purchase Inspection (PPI) on this Princess motor boat and found a most unusual phenomena in so far as the antifoul paint had been stripped clean in the areas immediately surrounding all underwater bronze skin fittings
The bottom had been antifouled blue on top of a copper undercoat, which undercoating had not been left clear of all underwater appendages such a skin fittings, rudder stocks, P brackets etc.
It is our opinion that an electrolytic current has been set up within the copper based undercoat and the bronze skin fittings, the consequence of which a ‘reaction’ has stripped off the blue antifoul paint within the immediate vicinity of bronze skin fittings.
When the copper undercoat was applied it is necessary to leave a clean (unpainted) radius of approximately 2″-3″ around ALL bronze skin fittings
The owner of this Princess is very fortunate not to have had his props, rudder, P brackets etc attacked and destroyed by electrolysis / galvanic action
For more information on electrolysis & galvanic activity visit (search) our earlier blogs entitled……
* Anodes for Boats – A Clear and Simple Resume PLUS:
* Searay 290 This blog / post details how a boat sank consequent of electrolysis
For more information contact European Marine Services Ltd. Marine Surveyors & Consultants
EMS also undertake Boat Safety Inspections & Engine Inspections
www.europeanmarinesurveys.com
Tel: 01603 327 123
SeaRay 290 | Sinking – Mercruiser Stern Drive Investigation | # 00726December 19, 2014
SeaRay 290 Sinking
Mercruiser Stern Drive Investigation.
This is important information for all Mercruiser Sterndrive installations / owners.
Being appointed by a well known Insurance Company to investigate this unfortunate incident, and without going into too much detail surrounding the circumstances of this incident we detail the causes and lessons to be learnt
Through a combination of high tides, highest rainfall recorded for the month, damaged rear cover, bilge pump failure and a strong current the twin petrol engine sterndrive 32′ offshore express cruiser sank.
Investigation
There was no evidence of any hull impact damage or no skin fitting failure
We were aware that both Mercruiser Stern Drive units had been totally submerged
There was no visual evidence of the transom bellows having split being the usual problem in such circumstances.
However from a previous (similar) investigation we were aware that the Mercruiser stern drive alloy casing – enclosing the steering arm / head – BEHIND THE MERCRUISER BADGES is subject to electrical / galvanic / electrolysis activity
Consequently the alloy casing wall behind the Mercruiser Badges is destroyed with a resultant hole and the inevitable sinking
View of resultant damage & water ingress through hole (electrolysis) in outdrive casing
Due to the stick-on badges this damage (hole) cannot or may not be seen or realised by a conscienous owner
Lessons to be learnt ……….
1. Pre-requisite to have an operational / automatic bilge pump – failure may result in an insurance claim refusal
2. Protect exposed areas, cockpits etc with a serviceable cover
3. Investigate and monitor the alloy casing enclosing the steering head, remove the Mercruiser labels if necessary to inspect
This boat was an insurance write off
This is the second (similar cause) sinking incident / cause that we have investigated – You have been warned
For more information contact European Marine Services Ltd. Marine Surveyors & Consultants
EMS also undertake Boat Safety Inspections & Engine Inspections
www.europeanmarinesurveys.com
Tel: 01603 327 123
LPG Gas Safety – Urgent NoticesOctober 15, 2014
 Urgent Safety Notices Concerning Gas Equipment
Recall of Calor Lite® cylinders 2008-11
Calor Gas Ltd has asked the BSS to help notify boaters that there is an immediate product recall on all 6kg Calor Lite® cylinders manufactured between 2008-2011 inclusive following concerns regarding the potential deterioration of the cylinder. Find out more here immediate recall information
Do you have a Beko, Flavel or Leisure LPG cooker installed on your boat?
Beko UK has an urgent safety notice and has asked for support from the Boat Safety Scheme.
There is an on-going Beko campaign to find and fix dangerous older models of Beko, Flavel and Leisure gas cookers that can produce potentially fatal levels of carbon monoxide, if used incorrectly with the grill door closed. Find out more here: Urgent Safety Alert
Boats with LPG (butane and propane) aboard
If your vessel has gas aboard, please remember to prepare the vessel before its examination and ensure there is a supply of gas ready for the examiner to undertake the checks.
LPG cylinder lockers – boat owners must ensure the BSS Examiner can carry out careful checking of the LPG cylinder locker for condition, including the removal of all loose portable items, base protection mats, removable false floors and the temporary removal of connected LPG cylinders.
Discuss your LPG cylinder locker arrangements with your examiner in advance of the examination as this may require your attendance or you to make prior arrangements involving service agents.
LPG lockers not accessible enough to allow an assessment of condition will involve the BSS Examiner having to return to carry out the check with the obstruction removed.
The BSS Examination includes checks on any LPG system covering aspects of the storage of gas cylinders, gas system and the connections to gas appliances.
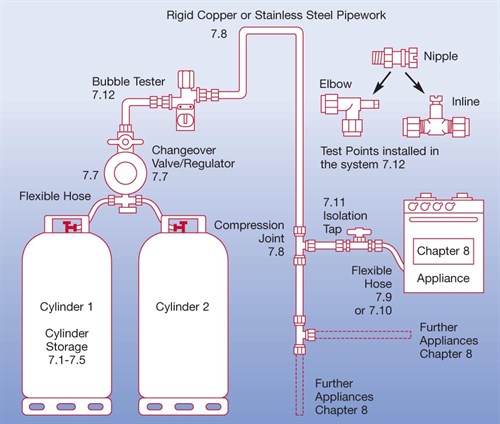
The complete set of checks can be read in Chapter 7 of the BSS Examination Checking Procedures (See page 40 of the PDF file).
Here is a diagramtic description of the BSS requirements linked to a boats LPG system. The numbers refer to the chapters and section in the BSS ECPs refered to in the link above.
How do we check your boat is free from gas leaks?
The BSS examination includes a test that checks that the gas system is free from leaks i.e the gas tightness-test.
However, we would like to stress that the system should be gas-tight (not leaking) all times, not just when the BSS examination is due.
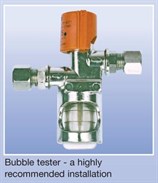
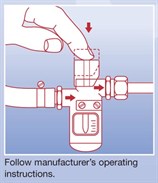
For boat owners the simplest way of having that assurance is to install a bubble tester and use it routinely. The examiner can also use this device to check the system is gas tight too, if it is installed correctly.
 |
 |
Where a bubble tester isn’t fitted, the BSS Examiner must use a device called a manometer, this has to be connected to a gas test point.
The test point is simply a threaded opening into the gas system. It is sealed by a screw action nipple. To test the system, the nipple is undone, the manometer is connected up, the test is carried out, the manometer is then disconnected and the nipple is tightened back down. It is tightened sufficiently to seal the test point once more to prevent a gas leak, but not so tight as to damage the seal and cause a gas leak.
For more information contact European Marine Services Ltd. Marine Surveyors & Consultants
EMS also undertake Boat Safety Inspections & Engine Inspections
www.europeanmarinesurveys.com
Tel: 01603 327 123
Marine Seacock Valves – Included within a Pre Purchase SurveyOctober 13, 2014
The importance of Boat Seacock Valves & their Accessibility
Definition: A seacock is a valve on the hull of a boat or a ship, permitting water to flow into the vessel, such as for cooling an engine or for a salt water faucet; or out of the boat, such as for a sink drain or a toilet.
Seacocks are left open or are closed depending on the situation. Seacocks feeding into or out of a closed system, like the engine cooling system, are almost always left open. Seacocks connected to something open, such as a sink drain, might be opened up in port but closed when at sea. The reason for this is that when the boat is level, the drain or other opening will always be above the waterline, and so water will only flow out. At sea, when the boat rolls in the waves, the opening may sometimes be below the waterline. If the seacock is open, water may flood the boat.
During a recent survey, I came across a major issue. Luckily not related to the structure of the vessel But the seacocks were not up to their job and inherently unsafe
The boat is fitted with four seacocks in or near by the engine space.
The engine seacock was seized and will probably be ok after servicing however the other three all displayed ‘safety’ problems
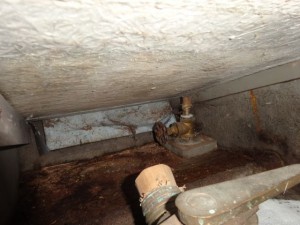
The water intake for the head has been mounted in a very difficult to reach part of the bilge. It is next to the chine all the way under the helm station sole board and even my extremely extended long arm couldn’t reach it. And it didn’t seam to be any easier access from the top unless one removed all the wires and useful bits from the helm station and unscrewed the sole board. So I don’t think this seacock has been serviced for a long time and all seacock must be easy to access and work on.
The third seacock was actually a lot easier to reach and had been made redundant. Nothing wrong with that except it was capped with a wooden bung, the bung being ‘pushed’ into the hole
A wooden bung can rot or split or dry and is mostly used as a quick fix to get a boat to safety when a pipe or a seacock is leaking. But it shouldn’t be used as a definite solution. A right solution would be to secure the seacock with a bronze screw cap and keeping the seacock closed as well.
Seacock # 4 Wasn’t actually there The pipe was directly fixed with one jubilee clip onto the skin fitting. Now would anyone feal safe about that ? Knowing that the skin fitting was 1.25″ diameter. Luckily the boat had one wooden bung but this was in use already on another seacock !
Well joke apart, any through hull aperture under the water line should be made secure and safe but also maintained in good condition. A wooden bung of the right size should be attached to each seacock so one doesn’t waste time looking for the bag of bungs in a moment of rush. And make sure your bilge pumps are in working order!
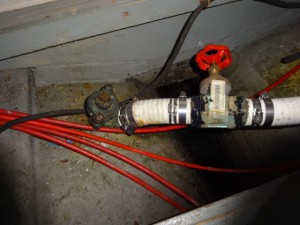
On another boat, a sea going one, I’ve found a gate valve attached via a 6” long hose to a Blake seacock fitted onto the hull. Now what had happened I believe is that the Blake valve had seized and didn’t get serviced so some one found a solution by fitting an in-line valve six inches away from the hull. Practical yes but not logical and not safe The Blake valve should have been serviced or replaced in this case with another seacock and job done. As at the moment the boat hasn’t got a seacock fitted onto the hull.
Original seized seacock plus second seacock added in-line
So as you can see from those photos, whether you use one or two seacocks or maybe none! It doesn’t matter, what you have to remember is that seacock are here to stop water coming in! And so they need to be serviced and kept in operational condition.
For more information contact European Marine Services Ltd (inc European Marine Surveys)
Tel : 01603 327 123 www.europeanmarinesurveys.com
LPG Safety Warning – Beko, Leisure & Flavel Gas CookersAugust 12, 2014
A Marine Survey Service from – European Marine Services Ltd
IMPORTANT SAFETY WARNING – BEKO, LEISURE & FLAVEL GAS COOKERS MANUFACTURED – PRIOR TO JAN 2009
If your cooker has been converted to run on LPG (bottled gas), please click here.
These appliances are designed for cooking purposes only and must NOT be used as a space heater, or for any other purpose. CHECK THE LIST BELOW TO SEE IF YOU OWN ONE OF THE AFFECTED COOKERS. Click on the model number to download an instruction booklet if required
WHAT YOU NEED TO DO IF YOU OWN ONE OF THESE COOKERS
1. FOLLOW THE PRODUCT INSTRUCTION MANUAL AND DO NOT OPERATE THE GRILL WITH THE GRILL DOOR CLOSED
When the grill burner is on, the grill door must always be in the open position. If the grill is operated with the grill door closed, the air supply to the grill burner is restricted which can cause extremely dangerous levels of carbon monoxide to be produced which can pose a very serious risk to health.
2. ARRANGE FOR A FREE SAFETY INSPECTION AND MODIFICATION
If you own or use any of the models shown above, please call Beko on:
- UK Free phone 0800 917 2018
0800 917 2018
- Ireland Free phone 1800 25 29 25
Beko customer care centre is open from 8am to 8pm, Monday to Friday, and 10am to 4pm Saturday and Sunday. We will then arrange to carry out a free modification to your product to remove any risk When calling please have your full model number and serial number to hand – these can be found on the rating plate at the bottom front edge of the appliance (see below).
| Beko | Leisure | Flavel |
|---|---|---|
| DCG8511WLPG | CM10NRK | DCGAP5LS |
| DCG8511PLW | CM10NRC | AP5LDWP |
| DG581LWP | AL6NDW | AP5LDW |
| CM101NRCP | AP5LDSP | |
| CM101NRKP | Flavel Milano ML5NDS |


