Leeward 18 – Visual Inspection / ReviewJuly 5, 2014
Leeward 18
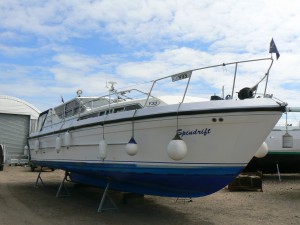
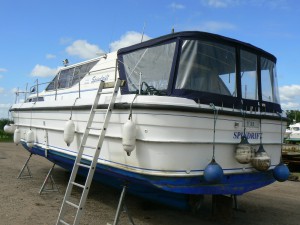
I was recently asked to look at a Leeward 18 for a visual and verbal report upon its condition.
I have to say that this was one of those enjoyable marine surveys where even from a distance I could see that the boat was in really good condition.
The previous owner had kept a good schedule of maintenance for the vessel and her engine. She has a Mercuiser sterndrive diesel engine and was visually well kept.
Those boats have been built for fishing purposes as well as leisure use. The GRP hull is strongly built to a high standard. She features a large aft cockpit with plenty of space for the fishing gears and also has a neat little cabin to be sheltered from the sprays when reaching the fishing spot.
The hull design allows the boat to plane and reach any destination in no time at all. But also can be very easily trailed by road to get to further afield places.
Looking forward to more of these
Marine Anodes for Boats – A Clear & Simple Resume
ALL ABOUT ANODES FOR LEISURE BOATS
” Plus Bonding Systems “
How do sacrificial anodes help keep your boat in good condition and possibly afloat
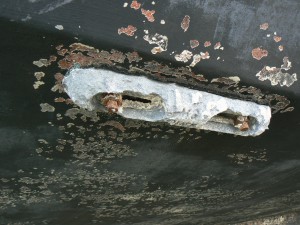
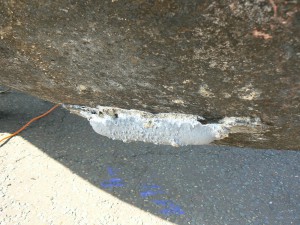
Pictures – Hull anodes that ” No longer have sufficient mass to be effective “
In a few words, how galvanic corrosion works.
Any two dissimilar metals submerged together in an electrolyte – sea water in our case – will create an electrical current known as a galvanic cell (like a battery), with the less noble (more active) metal, a bronze propeller for instance, forming the anode and the more noble (less active) metal, a stainless steel shaft, forming the cathode. The electrical current will travel from the less noble metal, anode, to the most noble metal, cathode, depleting the anode from its core material in the process.
The bronze propeller will gradually corrode away and this is where trouble will start.
The way around it is by adding a sacrificial anode to the system.
This anode will need to be made of a more active metal than the other two and thus the bronze propeller will now become a cathode and be protected.
That’s all fine when looking at a simple assembly such as a prop and prop shaft. Stick an anode on the shaft and that is generally sufficient but how about a bronze seacock and through-hull fitting? Not very practical to stick an anode on each one of them. So the answer is to electrically bond them to the anode.
All immersed metal components should be connected to the cathodic protection. Many ingenious systems exist to bond the engine, prop shaft and propeller and you should see with your engineer what would be best suited for your boat.
Anodes on non ferrous boat are generally bolted through the hull. Easier than welding onto a GRP hull or a wooden one!
But that’s great because now we’ve got two studs inside the boat connected to the outside anode. So now we can wire (bond) the seacocks to the anode’s studs, and the engine and prop shaft to another, or the same one depending on the size of the boat, and the amount of dissimilar metal within close range of each other. One thing to remember is that anodes can “see” the parts to be protected so long as the circuit is not broken.
A few things to look at when connecting them is that the connection is well made and kept on the inside of the hull and clear of bilge water.
Also, when you pop your head down the bilge, have a quick look at the connection as the bond might be broken due to galvanic corrosion and now what you were thought was protected by the anodic circuit is now isolated and will corrode.
Different Waters = Different Anodes
Three different types of anodes can be used:
- Fresh water Magnesium
- Salt water Zinc
- Brackish water Aluminium
The surface of a zinc anode when left in fresh water for some time become covered with an off-white crust. This will effectively seal the anode and stop it working when it is returned to the salt water. The consequences are that the next most anodic item bonded to the anode will start to sacrifice itself. It is therefore important to check the anodes after trips into fresh water. Also, if keeping the boat on the Norfolk Broads or brackish waters, aluminium anode would be a preferred choice to protect the vessel.
It is important to have them replaced when they reach ~50% of their original mass as the rate of galvanic corrosion is accelerating and your protection diminishing.
For Information: Very rapid zinc anode loss that results in bright, shiny metal being exposed is a clear indication of electrical activity, be it galvanic or stray current, usually the later, since galvanism rarely creates enough current to destroy zincs quickly .
Bright zinc in association with heavily corroded bottom paint means you have a problem that needs to be addressed immediately. The brightness of the zinc is telling you that there is too much current for the zincs to handle. Adding more zinc is NOT the solution
Earthing – Bonding Systems:
The purpose of a bonding system is to equalize the electric potential of dissimilar underwater metals by tying them all together with wire or copper straps. The benefits of a bonding system are wide ranging but little perceived. One is that it serves to dissipate stray current leaks. 12 volts of current focused on a small piece of metal will result in rapid destruction.
But that same 12 volts spread over a much larger surfaces, causes less damage in proportion to the size of the water exposed surfaces of the metal. Bonding systems can reduce the corrosion potential of metals inside and on the bottom of the boat.
Vessels which have all the hardware bonded, such as the railings, will suffer much less corrosion. The general rule is that anytime a piece of metal plumbing or hardware is isolated in a system, as with a sea strainer that is joined by two hoses is electrically isolated, needs to be wired into the system.
This can be done by daisy chaining items together, but it’s a good idea not to include too many items in a chain. Obviously, at any point where a connection is broken, all those items upstream will be unprotected.
DC Current leaks are the most common form of a stray current problem
Yes I know, We’ve just added another box to your winter maintenance tick list But hey, they need to be looked after.
Stern Drives, Outboards & Sail Drives
Now for those of you with a sterndrive, outboard or saildrive, things are bit more sensitive. See an earlier post SeaRay 290 Sinking – Mercruiser Stern Drive Investigation
As they are made in aluminium for lightness reasons, although of a high quality they are very prone to galvanic corrosion. It is very important to keep all the anodes in good condition i.e the anodes are depleting and not the stern drive casing. I often found that the little braided wire connecting the casing to the anodes was broken so make sure to keep the connection live!
Although the standard propeller is generally made of aluminium on those units it might have been replaced by a stainless steel prop for better performance, thus changing the situation. You will need to review your cathodic protection and install an extra and bigger anode.
Another silly one is when the ‘sport’ boat is moored, the sterndrive is often kept out of the water, which in some ways is a good practice. But on some boats the leg cannot be fully titled out of the water, leaving the gearbox partially immersed while the anodes are nicely dry in the sunshine enjoying their holiday and not doing much to protect the gearbox. It will lead to a rapid deterioration of the gearbox casing and resulting in water ingress.
To overcome that issue you can either fit an extra anode on the transom or hang some over the side of the boat (in the water) close to the leg.
Someone once told me that you can only have over protected your boat when it sinks from the weight of the anodes!
But most of all remember that a painted anode doesn’t work at all You can see the evidence by the end of the season when the anode is still painted and your prop is almost gone!
Now here is a simplified galvanic series. Platinum is pretty much up there on top of the noble metals but I thought I would stick to materials actually used in boat building just to keep it relevant to us.
Steel Hulls / Cathodic Protection
Currently most UK canal boats do not have enough anodes fitted to provide protection to all of the hull. Often we see vessels of considerable length (60ft plus) with only 4 hull anodes fitted. Typically 2 at the bow and 2 at the stern. Our literature has perhaps not helped as we do show vessels up to a wetted surface area of 56m2 with 4 anodes for protection and vessels up to 70m2 with 6 anodes. I would suggest that all vessels should as a minimum have 6 anodes, and as the vessels get longer in length they should have 8. I will be looking at updating our own literature to reflect this.
From a technical point of view an anode will only “throw” its protective current roughly 7 times its own length, which is why anodes are required to be equally spaced along the hull of the vessel to ensure good coverage. From this you can see that just fitting 4 anodes to a typical canal boat is not adequate protection for the entire hull. I suspect that most pitting corrosion you see is at the mid ships position, as this is the furthest point from the bow and stern mounted anodes.
The flip side to the argument for better cathodic protection is possibly that most canal boats operate in fresh water and this is a far less aggressive medium to salt water. Plus that anodes are used to provide a back up to a good protective paint system. However I still feel a belt and braces option is always best and especially verses the cost of hull plating.
Galvanic Series:
In this sample list, the metals and alloys are arranged in order of their potentials, measured with reference to an electrode immersed in salt water.
The list is arranged 00 – 12 with the least noble metals # 12 (ANODIC) at the top end and the most noble # 00 (CATHODIC) at the bottom.
ANODIC MOST ACTIVE
12: MAGNESIUM ALLOYS
11: ZINC
10: GALVANISED MILD STEEL
09: ALUMINIUM ALLOYS
08: MILD STEEL
07: LEAD
06: GUNMETAL
05: MANGANESE BRONZE
04: NAVAL BRASS
03: SILICON BRONZE
02: COPPER
01: MONEL
00: STAINLESS STEEL
CATHODIC – NOBLE PASSIVE / LEAST ACTIVE
For more information contact European Marine Services Ltd. Marine Surveyors & Consultants
EMS also undertake Boat Safety Inspections & Engine Inspections
www.europeanmarinesurveys.com
Tel: 01603 327 123
Westwood 38 | Osmosis & Gel Coat Delamination | # 00790June 27, 2014
EMS recently carried out a Pre Purchase Survey on a Westwood 38 and the most interesting ‘hull structural conditions’ were found – as follows …..
Firstly
” It is generally accepted that osmotic blisters will not be found with ‘low’ moisture meter readings. Not all blisters are caused by osmosis, some will be found to be dry blisters, these may often appear in the gel coat and usually caused by aeration when the original batch of gel coat was mixed ”
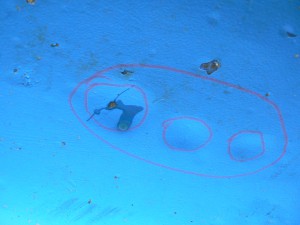
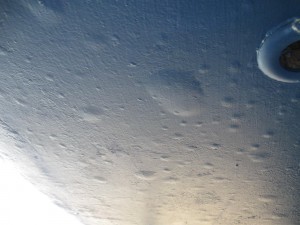
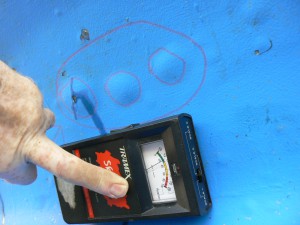
However the hull below the waterline had quite extensive blistering average about 20 – 30mm, with some odd blisters up to 60mm – the blisters being under internal pressure from blister juice
” A blister was burst giving off chemical-smelling (blister juice) liquid, being acid and breaks down the polyester in a process known as hydrolysis – being normally localized. The moulding as a whole will still retain most of its strength unless these current blisters become very much larger and much more extensive “
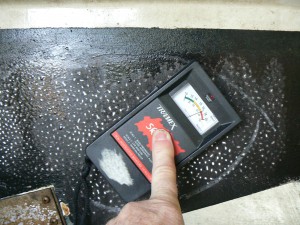
However, we discovered that the hull when measured with a Tramex Moisture Meter gave generally low readings of around 16% or for GRP ~1.6%. From experience such low readings with this degree of osmosis are very very unusual – and indeed ‘acceptable’ in a boat of this vintage
Secondly
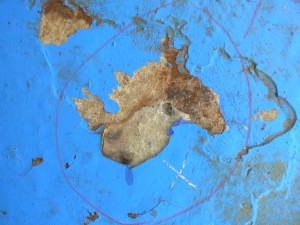
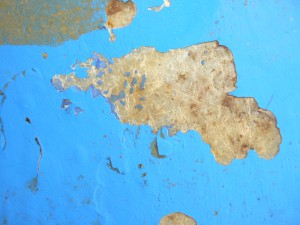
There were several small areas the size of a small plate (but not round) below the waterline where the gel coat laminate had actually ‘delaminated’ cleanly from the hull. Exposing the underlying substrate.
These small areas did not appear to have been the consequence of a large blister or combination of blisters
It appeared that (though we find this difficult to explain) the gel coat had never actually bonded with the substrate.
Despite the substrate being exposed constantly to water without the added protection of the gel coat, moisture meter readings taken on these exposed substrate areas also gave low readings
We are at a loss to explain the above and having carried out over 1,000 hull osmotic inspections over the past few years we have never (yet) come across such a combination / condition – There is always something new to learn !
Our advice to the client is to clean and dry the exposed areas of substrate and apply an epoxy coating
If anyone has come across such a combination of low meter readings plus extensive osmosis plus gel coat delamination, we would pleased to hear about it and welcome feed back
Exposed GRP substrate minus the gel coat Burst osmotic blister with ‘blister juice’
For more information contact European Marine Services Ltd. Marine Surveyors & Consultants
EMS also undertake Boat Safety Inspections & Engine Inspections
www.europeanmarinesurveys.com
Tel: 01603 327 123
Osmosis | What is GRP Osmosis & Wicking in a Boat ?June 23, 2014
OSMOSIS & WICKING
Picture 1 Sample – Small osmosis blistering showing a high moisture content reading
Very simply, the problem is caused by water penetrating the gelcoat and entering the laminated structure. This water takes in solution free chemicals salts and becomes denser than salt water on the outside of the hull. This creates a differential pressure and since water will not compress blisters form on the outer side of the gelcoat
Unfortunately the development of blisters is not predictable, some vessels may indicate high moisture content, suggesting the presence of blister fluid, but will not develop blisters for many seasons if at all, others may have similar readings with blisters present. It is generally accepted that osmotic blisters will not be found with ‘low’ meter readings – though this is not always true. Not all blisters are caused by osmosis, some will be found to be dry blisters, these may often appear in the gel coat and usually caused by aeration when the original batch of gel coat was mixed.
These swell with water and raise localised rashes on the gel coat which disappear after a short time ashore and usually of no consequence.
Blisters caused by osmosis particularly at the outset may not be easy to find, as they may not be very numerous and will be quite small, having the appearance of small pimples, on average they may reach fingernail size (approximately 10 mm diameter), in extreme cases these may reach hand palm sized or larger when many blisters merge and combine making very large individual blisters, although this is a rare occurrence on modern craft, and probably would have been attended to long before it had reached this size. Serious delamination would be a result of this extreme circumstance.
However, early treatment of osmotic boats in early stages tends to be less successful than treatments of vessels with advanced blistering.
Sample – Both small and large blistering
Experience has shown that the breakdown process in GRP laminates take some time to reach its conclusion, therefore if treatment is carried out prematurely, it is much more difficult to remove solutes from the laminate, and a reoccurrence of osmosis is much more likely to occur.
At the other extreme, a visual examination revealing extensive gel coat and deeper seated blisters may be all that is necessary to produce a diagnosis of “osmosis”.
Photo 1 – The first osmotic blister was burst giving off chemical-smelling (blister juice) liquid – quite often under pressure, being acid and breaks down the polyester in a process known as hydrolysis – being normally localized. The moulding as a whole will still retain most of its strength unless these current blisters become very much larger and much more extensive. NOTE The relatively low moisture meter readings obtained
Wicking: Wicking is where the individual strands of the fibreglass mat behave like straws and draw water along their length, in doing so they swell in size and wicking will quite commonly be identified by a very slight raised pattern of the original matting visible on the gel coat.
Very often as the water dries out the swelling diminishes and the pattern disappears. When looking at a gel coat without pigment, wicking is easily identified because the area affected will have many individual strands of fibreglass clearly visible with a white outline.
This white outline is where the bond has broken between the resin and each individual strand. This ‘wicking’ is an indication that there is moisture in the resin, and is often a precursor to or accompanies blistering.
Treatments:
Do nothing. On an old, heavily built boat, this is a genuine option. If there are no blisters I would definitely do nothing even if a moisture meter shows very high readings. If there are blisters but they are small and not too many they are not likely to have any significant effect on the structural strength
Local treatment. Cut or grind open individual blisters, repeatedly wash out with hot water or steam, to remove the ‘blister juice’ from any blisters, dry thoroughly and fill with epoxy paste (not car body filler).
Hugo du Plessis, author of what is virtually the standard reference work on GRP yachts, regards this as the best option in almost all cases, and says total gelcoat replacement (see below) should be an absolute last recourse.
Next winter you may have a few more blisters – usually in different places. The fact that they are usually in different places is a significant one – you are not getting blisters re-occurring but new ones developing.
Go to your local ‘Osmosis treatment centre’ and pay rather a lot to have the gelcoat removed, the hull washed and dried out, and the hull recoated with epoxy. The smaller and older the boat the less cost-effective this is. Treating an old river cruiser could cost almost £4 – 5,000 on a boat perhaps only worth £15,000.
On a 50-footer worth £150,000 the cost might be £8,000 – a far lower proportion of the boat’s value. Yards used to offer a five year warranty with this work – many no longer do so, or charge extra if you want the warranty (they buy insurance against claims).
Osmosis Protection Scheme Other protective measures that can be considered for ‘hull protection’ are to sheath with a water barrier such as International Gelshield 200 or VC Tar2 which is applied over existing gelcoat – however such applications cannot stop osmosis once it has started. Such applications if applied following the manufacturer’s instructions are usually successful and can greatly extend the useful life of the hull structure.
Acknowledgement: https://www.yachtsnet.co.uk/osmosis.htm
For more information contact European Marine Services Ltd. Marine Surveyors & Consultants
EMS also undertake Boat Safety Inspections & Engine Inspections
www.europeanmarinesurveys.com
Tel: 01603 327 123
Marine Surveying & Boat AccessJune 16, 2014
Marine Surveyor – Access
‘When undertaking a marine survey it is useful to have access to ALL areas’
During a recent inspection of a GRP motor yacht I was faced with a bit of a dilemma.
The vessel has a separate bilge for the diesel tank forward of the engine bay which I should access to report on the condition of the tank, filler, breather and condition of hull and other various bits.
The issue was that the GRP access panel was screwed down with about a dozens of screws. That shouldn’t be a problem I said to myself, I’ll simply remove the screws and have a look at the tank and other bits.
The real problem was that most of the screws were rusted and stuck tight. I couldn’t open the panel without damaging the GRP panel or breaking the head of screw, so at the end I couldn’t report on the condition of the bilge and diesel tank.
It is in the best interest of all parties, the buyer, the seller and the surveyor that easy access to all parts of the boat is made prior to a survey. For a start it cuts down on the time of inspection but it mainly allows the surveyor to access seacocks hidden behind varnished screwed in panels or to access rudder stock without having to empty a lazarette filled with fishing gears, fenders and tarpaulin and certainly in this instance to gain access to a diesel tank and its surroundings.
If we can’t see it or access it we can’t report on it
For more information contact European Marine Services Ltd (inc European Marine Surveys) Tel : 01603 327 12301603 327 123 www.europeanmarinesurveys.com
1960 Broom 42 Admiral Class | Pre Purchase Survey | # 00729March 26, 2014
Welcome to European Marine Surveys, based in the heart of East Anglia & the Norfolk Broads. As marine surveyors we undertake inspections of all types (including the popular pre-purchase survey) of marine craft from classic broads wooden yachts, ex hire boats, inland waterway craft, house boats, steel narrow boats Plus offshore yachts, large ocean going motor boats, sports cruisers & many more types since the 1980s.
We below provide information on surveys of interest
1960 BROOM 42 ADMIRAL CLASS ‘Katinka’
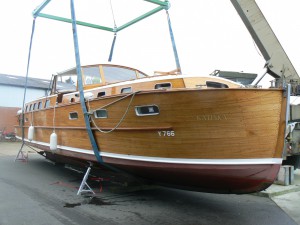
In February we were instructed by Broadland Yacht Brokers on behalf of their client to undertake a Pre Purchase Inspection on the 1960 classic Broom Admiral Class 42′ ‘Katinka’ Other than a few minor problems this 54 year old broads motor cruiser passed with flying colours and is a credit to her owners and Broom Boat Builders
We have reproduced the below from Anglia Afloat Magazine for your information
Irish-born Buckinghamshire resident businessman Emmet Hart is one lucky son of a gun, he owns the iconic Katinka, arguably one of the most beautiful motor cruisers ever built. Katinka was built in 1960 to a 1940s design by CJ Broom & Sons in Brundall, Norfolk, the very last wooden Broom ever built by the UK’s longest established motorboat manufacturer founded in 1898.
She’s a customised version of the Admiral class, which at the time was the largest boat built by Brooms at 42ft. She is unique, having been privately owned by the same family for 52 years.
Built for Professor Jack Mayne of Cambridge in 1960 she remained in the factory’s wet boathouse and was maintained by Brooms for fifty-two years, with any work required during her lifetime being carried out by the Broom factory. Since her launch in 1961 she has only cruised a total of 791 hours, 12 of those under her new owner.
Katinka’s hull is built of Iroko on oak frames, a bespoke build strengthened and lengthened slightly for coastal voyages to enable her owners to explore the numerous rivers and inland waterways around the UK. Completely varnished to the waterline and antifouled below and with varnished Mahogany coachroof and cabin sides she is a stunningly elegant craft.
Stunning finish – Down below she is finished in gleaming varnished Mahogany, with white enamelled locker fronts and deck heads and with new light-coloured upholstery throughout is light and airy. She still retains most of her original fixtures and fittings but has a newly fitted galley with fridge freezer, combination cooker and hob, Webasto warm air heating and electric heads.
There’s an open cockpit aft with surrounding bench seating. Double swing doors lead into the full width galley; to port is a new gas cooker and hob, full size front opening fridge and a generous worktop, while to starboard is more worktop with a s/s sink and drainer and cupboards under.
Forward of the galley is the main saloon with settees that convert to single berths, a folding central dining table with cutlery drawer that will seat six in comfort. There’s storage drawers under the settees and a low-line cupboard each side aft. At the forward end is a large double cupboard to port and a large heads with electric WC and washbasin, to starboard. Offset to port is a set of steps leading up into the spacious central cockpit. The side windows all hinge at the bottom and tilt inboard to rest on wedge-shaped wooden brackets when open. Lower windows in the hull are permanently sealed.
The control console is mounted to port, with the access companionway to the forward accommodation to starboard. The original stainless steel instrument panel looks almost as good as new and the tacho reads 791 hours on the 3.4 litre BMC Commodore engine under the cockpit sole. This pushes her along at a comfortable cruising speed of eight knots up to a maximum of 10 knots.
Also under the floor are the fuel and water tanks and batteries, putting the bulk of the weight in the centre of the craft and giving her an even trim and reducing the motion at sea.
The cockpit hard top folds back over the aft coachroof to give open air motoring on fine days and reducing the air draught for ducking through Broads’ bridges.
Owner’s accommodation – The forward companionway leads down to the owner’s double berth thwartships cabin with double berth to port with locker stowage and dressing table and wardrobe to starboard. Also under the bunk is a Webasto heating unit feeding warm air throughout the whole craft. Further forward again is a large family heads to port and a shower to starboard with a twin-berth cabin in the forepeak. Stowage is in large drawers under the berths and a large hanging locker by the companionway.
Emmet Hart bought Katinka in early 2013 as a substitute for his 37ft motor cruiser Snowgoose while she was being restored at Oulton Broad-based International Boatbuilding Training College. Interestingly, the two Norfolk built boats had been completed within a year of each other yet they clearly hail from different eras. Katinka is unquestionably a 1940s motor cruiser with a few minor concessions to the 1960s whereas Snowgoose is more in keeping with the era of her construction.
E C Landamore & Co built Snowgoose for Edward Suckling in 1962. Originally named Eclan in honour of her builders she was based on the design of the company’s 5-berth Vestella class motor cruisers.
However, the completion of Snowgoose’s restoration in October 2013 presented Emmet with a real dilemma, which boat should he keep? While he is in the fortunate position to be able to fund the running costs of both boats he feels that they should be regularly used rather than gathering dust in a boat shed.
Having enjoyed a memorable summer of cruising in Katinka, which included several months on the Thames where her immaculate appearance caused quite a stir during the Henley Royal Regatta, he reluctantly decided to put her up for sale to see if a new custodian can be found for this remarkable slice of Broadland history. If not, Emmet will simply continue to enjoy the contrasting qualities of two of the region’s finest classic motor cruisers.
Katinka Specification:
LOA: 43ft LWL: 42ft Beam: 10ft 6in Draught: 2ft 6in Air Draught: 6ft 4in Cruising Speed: 8 knots Max Speed: 10 knots
For more information contact European Marine Services Ltd
Tel European Marine Surveys on 01603 327 123


